
Of all the Photoshop tools for making selections, the Quick Selection Tool is by no means the best. It is one of the fastest though. In Photoshop Tools How To – the Quick Selection Tool I will explain its features and some tips for using it.
Where do I find the Quick Selection Tool?
The Quick Selection tool can be found in the Tools Panel on the left-hand-side of the Photoshop work space.
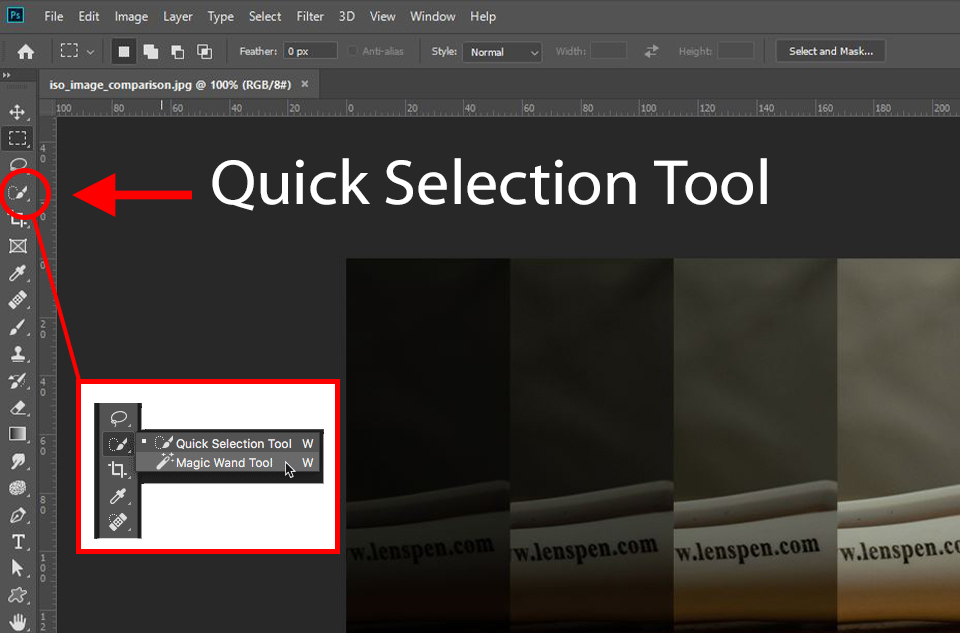
Click and hold your left mouse button. A menu will pop out where you can select the Quick Selection Tool, or the Magic Wand Tool.
TIP: You can aslo open the Quick Selection Tool or the Magic Wand Tool by pressing “w” key on your keyboard).
Once you have your Quick Selection Tool open, your cursor will turn into a little circle with a + in the middle of it.
If you have had the Magic Wand tool open previously, your cursor will be a little wand. You’ll need to left click on the Quick Selection Tool icon and change back to the Quick Selection Tool.
Another great Photoshop tool for selecting is the Lasso Tool. I’ve written a great blog post about the Lasso Tool In Photoshop you might want to read.
Quick Selection Tool Options
You will now see some options for the tool along the top of your screen, below the Menu Bar. These control what the tool does and how it does it.

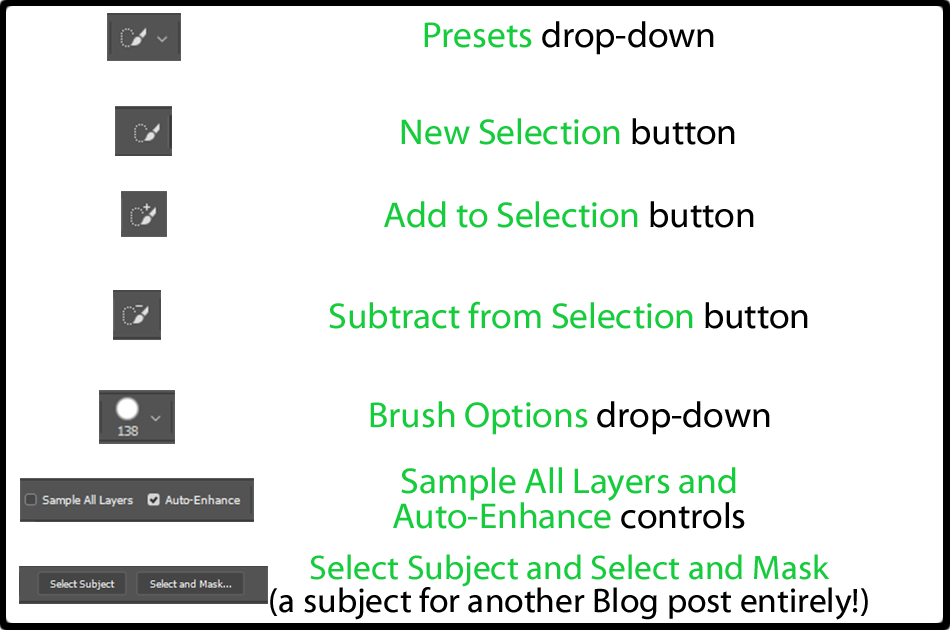
The first button with the little arrow next to the icon is the Presets drop-down. This is where you will find any presets that you save for this tool. This is handy if you find settings for the tool that work well in a certain situation. You can save them as a preset here and use them just by opening this dialog and clicking the preset you want to use.
Next to that you will find the New Selection button. This is self-explanatory, it is what you click to make a new selection.
The next button with the + symbol in the icon is the Add to Selection button. If you choose this, the brush will add more to your existing selection. This is great for adding to your selection without erasing any selection you’ve already made. In Photoshop CC, the Quick Selection Tool defaults to this setting.
The next button with the minus symbol in the icon is the Subtract From Selection button. If you choose this, the brush will subtract from what you have already selected. This is good for deselecting any areas you don’t want selected.

Brush Options and beyond….
Next we have the Brush Options drop-down dialog. This is where you control all the brush settings such as Size, Hardness, Spacing, Angle, and Roundness. These will decide how effective the tool is at selecting, so I suggest you experiment and find settings that work well for the document you are working in.
TIP: You can also change the size and hardness of your brush by holding Alt. (option on a Mac), and dragging your mouse. Holding Alt. and dragging the mouse left or right will decrease or increase the size of your brush, while dragging the mouse up will give you a softer brush and dragging it down will give you a harder brush.
Next there are check boxes for Sample All Layers and Auto-Enhance. Sample all layers does what it suggests – if you have a document with multiple layers, the selection tool will sample from all layers when making a selection. Turn this off if you just want to sample from one layer only.
Auto-enhance improves the edges of your selection and generally gives you a better selection, so I suggest leaving that box checked.
Select Subject and Select and Mask are controls that require a lot of explanation, so I will cover them in a separate blog post.
You can also watch my YouTube video How To Use The Quick Selection Tool in Photoshop CC – Select and Mask for an in-depth look into Select and Mask.
An incredible sharpening plugin for Photoshop from Topaz Labs. Powered by AI technology, this plugin can rescue shots you thought were bound for the recycle bin. Try Topaz Sharpen AI for yourself free for 30 days by clicking the image below. Look for the TRY AI SHARPEN FOR FREE button when you get to that page.

Using the Quick Selection Tool
Using the Quick Selection Tool is super-easy. Simply choose a size for your brush that will fit inside of what you are selecting and click and drag within the object you are trying to select. The tool will do its work and select the object for you.
As you drag the brush across what you are selecting the “marching ants” will appear which outline what you have selected. You can then adjust your selection using the Add to Selection or Subtract from Selection buttons.
TIP: You can also leave Add to Selection on and simply hold Alt (or Option), and the centre of the tool will change from a + to a – symbol, and you can subtract from your selection.
Summery
There you have it. That is the Quick Selection Tool in Photoshop. This is of course just a summery of the tool. If you would like a more in-depth photo editing tutorial, please see my YouTube video How To Use The Quick Selection Tool in Photoshop CC – Photoshop Tools Tutorial. My channel is loaded with photography how tos to teach you photography basics, and so much more. Please subscribe while you are there.
If you found this post interesting, please share it using the Social buttons below. Please leave me a comment too.